
High-quality product photography plays an important role in e-commerce. Customers cannot physically examine products before purchasing them, so images help them understand details such as size, color, texture, materials and overall quality.
For online retailers, consistent product images can also create a more professional storefront and make it easier to present a large product catalog.
Setting up a product photography studio does not necessarily require a large commercial space or expensive equipment. The right setup depends on the products you photograph, the number of images you need to produce and the visual standards of your online store.
In this guide, we explain how to set up a product photography studio for e-commerce, from choosing the space and equipment to building an efficient photography workflow.
1. Choose the Right Space for Your Product Photography Studio
The first step is to identify a space that supports your photography requirements.
A small, dedicated room can work well for compact products such as cosmetics, accessories, electronics and packaged goods. Larger products, furniture and lifestyle photography may require more floor space and greater distance between the camera, subject and lighting equipment.
Before choosing a location, consider the following factors.
Available Space
Measure the area you intend to use and consider how much room you need for the product, camera, lighting equipment and background.
Remember to leave enough space to reposition lights, change camera angles and photograph products of different sizes.
Ceiling Height
Ceiling height can affect your ability to position overhead lighting, particularly when photographing reflective products, furniture or larger objects.
A higher ceiling can provide greater flexibility for complex lighting arrangements.
Power and Equipment Access
Make sure the space has convenient access to power outlets and enough room for cables, stands and other equipment.
Organized cable management can also help reduce clutter and improve safety during shoots.
Ambient Light Control
Natural light can be useful for certain product photography styles, but relying on changing daylight can make it difficult to maintain consistency across a large product catalog.
A space where you can control or block external light gives you greater flexibility when reproducing the same lighting conditions across multiple sessions.
2. Select the Essential Camera Equipment
Your camera setup should support the level of detail, image quality and consistency required by your e-commerce platform.
You do not need the most expensive equipment to get started. However, you should choose equipment that can produce sharp, accurately exposed images at the required resolution.
Camera
A camera with manual exposure controls and the ability to capture high-resolution images is a practical starting point.
Both mirrorless and DSLR cameras can work well for product photography. The right choice depends on your budget, lens options and existing equipment.
For a studio that photographs products regularly, repeatable settings and reliable performance are often more important than having the newest camera model.
Lens
The lens influences perspective, detail and how the product appears in the final image.
A standard or short telephoto lens can work well for many product categories. Macro lenses are useful when you need close-up images of small details, such as jewelry, surface textures or product components.
Avoid choosing a lens solely because it has a wide maximum aperture. For many e-commerce images, controlled depth of field and consistent sharpness are more important.
Tripod
A stable tripod helps keep framing consistent between products.
This is particularly useful when photographing multiple color variations, creating comparison images or producing a large catalog with the same composition.
A tripod also makes it easier to use lower ISO settings and slower shutter speeds when working with stationary products.
3. Build a Lighting Setup for Consistent Results
Lighting is one of the most important elements of a product photography studio.
It determines how clearly customers can see product details, how colors appear and how shadows and reflections affect the final image.
The best lighting arrangement depends on the product. A matte cardboard package requires a different approach from a glossy bottle, a watch or a metallic accessory.
Start With a Simple Lighting Arrangement
For many products, a basic setup can include:
One primary light source
A softbox or another light modifier
A reflector or fill light
A suitable surface and background
Optional flags or diffusers for controlling reflections
A single light with a reflector can produce effective results for simple products. More complex objects may require multiple lights to control highlights, separate the subject from the background or reveal specific details.

Match the Light to the Product
Soft, diffused light is useful for many e-commerce products because it can reduce harsh shadows and produce a clean appearance.
However, completely eliminating shadows is not always desirable. Some shadows help communicate shape, depth and the relationship between the product and its surface.
For reflective objects, lighting placement and the size of the light source can be particularly important. Large diffused sources, flags and carefully positioned reflectors can help control unwanted reflections.
Maintain Consistent Lighting Settings
Once you establish a lighting setup that works, document it.
Record the light positions, power settings, camera settings and product placement. This makes it easier to reproduce the same look when photographing additional products.
4. Choose the Right Background and Shooting Surface
The background should support the product rather than compete with it.
For standard e-commerce listings, a clean white or neutral background is often appropriate. Lifestyle and advertising images may require more colors, textures, props or environmental details.
White and Neutral Backgrounds
White backgrounds are commonly used for product listings because they make the subject easy to identify and can create a consistent catalog appearance.
Gray, beige and other neutral tones may work better when a product has light-colored surfaces or when a slightly different visual style is required.
Colored and Textured Backgrounds
Colored backgrounds can help communicate brand identity or distinguish product categories.
Textured surfaces can add visual interest to promotional images, particularly for cosmetics, food, homeware and lifestyle products.
Use these elements selectively. A background that looks attractive on its own may distract from the product when combined with packaging, labels and other visual details.
Select a Suitable Shooting Surface
The surface must support the product securely and fit the intended composition.
For small products, a tabletop setup may be sufficient. Larger products may require a floor-level arrangement or a dedicated platform.
If you photograph reflective products, pay attention to how the shooting surface appears in the product itself. Glossy materials can create reflections that need to be controlled through lighting and positioning.
5. Organize Your Studio for Different Product Categories
An e-commerce studio should be flexible enough to accommodate the products you sell without requiring a complete redesign for every shoot.
Different product categories have different technical requirements.
Small Products and Accessories
Jewelry, watches, electronics and small accessories often benefit from a compact setup with precise camera positioning.
Close-up work may require macro lenses, stable support and careful control of reflections.
Clothing and Fashion Products
Fashion photography may require a larger shooting area, depending on whether products are photographed flat, on mannequins or on models.
You may also need garment racks, steamers, styling tools and additional space for changing products between shots.
Furniture and Homeware
Larger products need more room for camera positioning and lighting.
A wider shooting area can also help you capture multiple angles, contextual images and details without repeatedly moving the product.
Cosmetics and Packaged Products
Packaging photography often requires careful attention to labels, colors, edges and reflections.
Create a setup that allows you to reproduce the same camera angle and lighting across different product variants.
6. Create a Repeatable Product Photography Workflow
A product photography studio becomes more efficient when the process is standardized.
Without a defined workflow, teams may spend unnecessary time adjusting equipment, correcting inconsistencies and reshooting products.
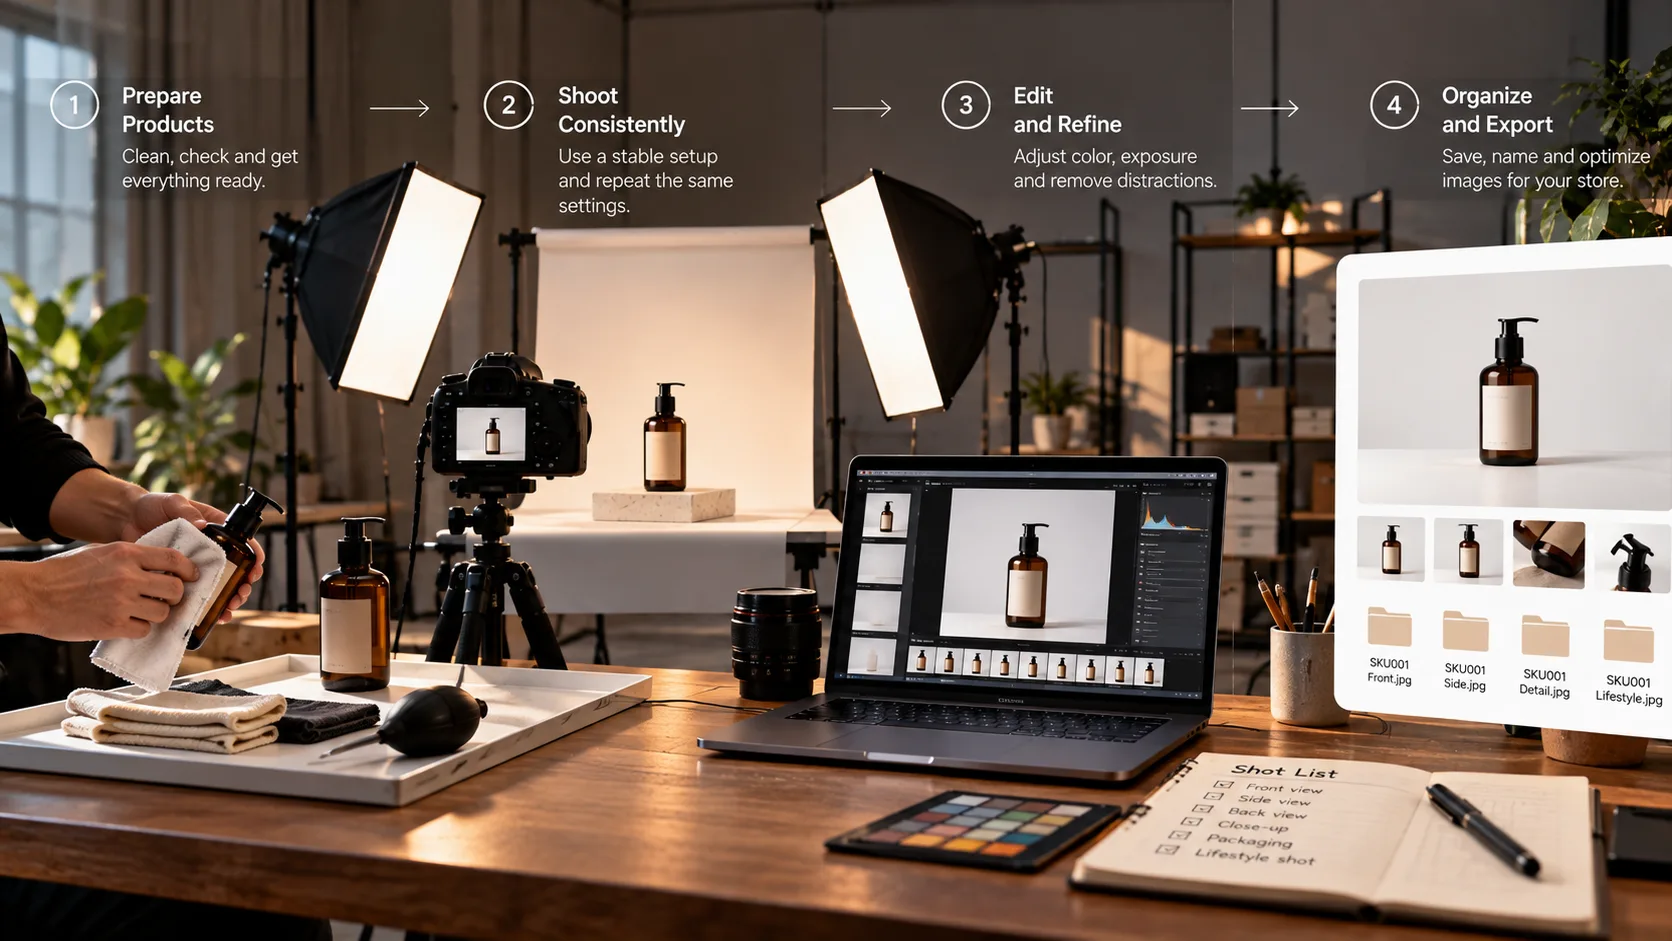
Prepare Products Before the Shoot
Before photographing each item:
Clean the product and remove dust.
Check labels and packaging.
Remove fingerprints and visible marks.
Prepare any required accessories.
Confirm which angles and details are needed.
These checks can reduce editing time and help maintain a consistent standard across the catalog.
Create a Shot List
A shot list defines the images required for each product.
Depending on the product and platform, this may include:
Front view
Side view
Back view
Detail or close-up
Packaging
Product in use
Lifestyle image
Not every product needs every image type. The shot list should reflect customer needs, platform requirements and the complexity of the product.
Standardize Camera Settings and Composition
For catalog photography, consistency matters.
Use repeatable camera settings, fixed camera positions and clearly marked product placement where possible.
Keep framing, scale and background treatment consistent across related products. This makes the online store easier to browse and gives customers a clearer basis for comparing products.
7. Plan Your Post-Production Workflow
Photography does not end when the images are captured.
Editing helps prepare files for online publication and maintain a consistent appearance across the product catalog.
Color Correction and Exposure
Correct exposure and white balance so that products appear as accurately as possible.
Color accuracy is especially important for products such as clothing, cosmetics, furniture and accessories, where customers may rely on images to distinguish between color variations.
Retouching
Remove distracting dust, minor marks and unwanted visual imperfections where appropriate.
Retouching should improve image clarity without misrepresenting the product or hiding details that customers need to evaluate.
Image Cropping and Export
Prepare images according to the requirements of your website or e-commerce platform.
Check aspect ratios, image dimensions, file formats and compression settings. Avoid excessive compression that reduces visible detail.
File Naming and Organization
Use a consistent file naming structure based on product IDs, SKUs, variants or image angles.
For example, a product catalog might use names such as SKU123-front.jpg, SKU123-side.jpg and SKU123-detail.jpg.
An organized file system makes it easier to locate images, update listings and manage future reshoots.
8. Optimize Product Images for Website Performance
Large, high-resolution images can affect page loading speed if they are not prepared correctly for the web.
A good workflow should balance image quality with performance.
Consider these practices:
Resize images to suit their display dimensions.
Use modern formats such as WebP or AVIF when supported by your platform.
Compress files without introducing visible quality loss.
Use descriptive, relevant file names.
Write useful alt text that describes the image accurately.
Avoid uploading multiple unnecessarily large versions of the same image.
Test how images display on mobile and desktop devices.
Image optimization should not compromise the detail customers need to assess a product.
9. Decide Whether to Build an In-House Studio or Rent One
Not every e-commerce business needs a permanent photography studio.
The right choice depends on product volume, shooting frequency, available staff and the level of production required.
When an In-House Studio Makes Sense
An in-house setup may be suitable when you photograph products frequently, need rapid updates or work with a large catalog that requires regular additions.
It can provide greater control over scheduling and allow your team to maintain a consistent photography process.
However, the business must account for equipment costs, space, maintenance, staffing and ongoing production needs.
When Renting a Photography Studio Makes Sense
Studio rental can be useful when you need professional equipment, a larger shooting space or a specialized setup for a particular project.
It may also be practical for seasonal campaigns, new product launches or occasional catalog photography when maintaining a dedicated studio would not be cost-effective.
Before booking, consider the studio's available equipment, shooting area, access arrangements, rental duration and suitability for your products.
10. Common Mistakes to Avoid When Setting Up a Product Photography Studio
A functional studio is not simply a room with a camera and lights. Several common mistakes can affect both image quality and production efficiency.
Buying Equipment Before Defining Your Needs
Purchasing equipment without considering product size, shooting frequency and image requirements can lead to unnecessary expenses.
Start by defining your workflow and identifying the equipment that directly supports it.
Using Inconsistent Lighting
Changing light positions or settings between products can create noticeable differences in shadows, color and contrast.
Document your setup and make adjustments deliberately.
Ignoring Color Accuracy
Images that misrepresent product colors can create incorrect customer expectations.
Use consistent white balance, suitable lighting and a controlled editing process.
Overcomplicating the Background
Decorative backgrounds and props can be useful for promotional photography, but they may distract from the product in standard catalog images.
Choose a background based on the purpose of each image.
Neglecting File Management
Poorly organized files can make it difficult to update product pages or identify the correct image for a specific variant.
Create a naming and storage system before the catalog becomes difficult to manage.
Product Photography Studio Setup Checklist
Before your first shoot, make sure you have considered the following:
A suitable space with enough room to work
Camera and lens appropriate for your products
Stable tripod or camera support
Lighting equipment and suitable modifiers
Backgrounds and shooting surfaces
Reflectors, diffusers or flags where needed
Product cleaning and preparation tools
A repeatable shot list
Standardized camera and lighting settings
An image editing and color correction process
A consistent file naming system
Image export and web optimization settings
You can start with a basic setup and expand it as your product range and production requirements grow.
Frequently Asked Questions
What equipment do I need to set up a product photography studio?
A basic setup typically includes a camera, a suitable lens, a tripod, lighting equipment, light modifiers, a background and a stable shooting surface. The exact equipment depends on product size, materials and image requirements.
How much space do I need for a product photography studio?
Small products can be photographed in a compact tabletop setup. Larger products, furniture and lifestyle photography require more room for camera positioning, lighting and product placement. The space should match the largest and most complex shoots you plan to produce.
Can I set up a product photography studio at home?
Yes. A home setup can work well for small products and businesses with limited production needs. The key is to create a controlled shooting area with consistent lighting, enough space and a repeatable workflow.
What lighting is best for e-commerce product photography?
Diffused lighting works well for many products, but the ideal setup depends on the material and desired appearance. Reflective products often require more careful positioning and reflection control than matte products.
Should I build a product photography studio or rent one?
Building an in-house studio may make sense if you photograph products frequently. Renting can be more practical for occasional projects, larger products or shoots that require specialized equipment and space.
How can I keep product images consistent across my online store?
Use standardized camera settings, lighting positions, backgrounds, product placement and editing guidelines. Documenting the process helps maintain consistency as the catalog grows.
Set Up a Product Photography Studio That Supports Your Business
A well-planned product photography studio helps e-commerce businesses create consistent images, streamline production and present products clearly to potential customers.
The most effective setup is not necessarily the largest or most expensive. It is the one that matches your products, production volume and online store requirements.
If your business needs a professional space for product photography, HELIO offers studio and production services in Dubai to support product shoots and commercial visual content. Choosing the right studio setup can help your team produce images that meet your brand and e-commerce requirements.